Pages

Thursday, October 28, 2010

Mischievous Meringues


Happy Halloween!! 

I thumbed through a bunch of magazines at the grocery store and was inspired to try making French Meringue cookies for the first time.  I was a little scared; I thought maybe they'd be finicky and requires lots of sweet whispering in order to turn out mildly ok.  I was totally wrong.  These little puppies are so fun to make!  Plus, they're fat-free, gluten-free, and milk-free!

The recipe only requires 3 ingredients and about 20 minutes to get put together and onto the cookie sheet.  And then, the meringues take....3 hours to bake.  But don't let that deter you!  You just put them in the oven and let them do their (slow) thing.  I'm imagining all kinds of shapes that you could make for other occasions - snowflakes and snowmen, initials, numbers, words, hearts, and on and on.

A couple of notes:  French meringue cookies are sensitive to moisture, so don't go crazy adding in lots of food dye and/or flavorings.  (I added 1/4c. powdered sugar just to compensate for my 1tsp. vanilla.)  Go ahead and swap out the vanilla for whichever flavoring you like - 1/2 tsp. peppermint and 1/2 tsp. vanilla extracts would be so yummy for Christmas, don't you think?  Also, I've read that baking these on a humid or rainy day can require longer baking time.  It was both rainy and humid when I made these last night, and they were finished in 2 1/2 hours.  So, just check them after 2 1/2 hours and go from there.

Enjoy!


French Meringues

4 egg whites
2 1/2 c. powdered sugar
1 tsp. vanilla
chocolate chips for eyes, or other decorations

Preheat the oven to 185 degrees F and line a baking sheet with parchment paper.

In a chilled glass or metal bowl, whip egg whites until foamy using an electric mixer at medium speed (I set my KitchenAid to "6").  Add vanilla (and food coloring, if desired).  Add in the powdered sugar, 1/4 cup at a time, while continuing to whip at medium speed. When the mixture becomes stiff and shiny like satin, stop mixing, and transfer the mixture to a large pastry bag (or large ziploc bag with a corner snipped off). Pipe the meringue out onto the parchment paper using a large round tip or star tip.  Place chocolate chips into your shapes or add sprinkles.

Place the meringues in the oven and bake on the middle rack for 2 1/2 - 3 hours, or until the meringues are dry, and easily slide on the parchment paper. Allow cookies to cool completely before storing in an airtight container at room temperature.


Egg whites:  Foamy.


Egg whites:  Stiff, and shiny like satin. 


To make filling easier, I use a tall glass to prop up my
pastry bag (or ziploc) while I spoon in the meringue.


Before baking: 
(this recipe filled 2 cookie sheets)


And after!


A ghost owwie: 


The inside of meringue cookie is crunchy and fluffy,
all at the same time. 


Bookmark and Share

Wednesday, October 27, 2010

Bat Wings, Candy Corn and Witches Brew Too!

Halloween is a favorite time of year around this house.  There isn't anything I don't like about it!  The candy, the costumes, the decorations, the FUN! 

To keep with the spirit of the Halloween fun I whipped up a themed dinner of Bat Wings and Candy Corn.  Both of these recipes come courtesy of my Family Fun Cookbook.  While this candy corn might not be the candy corn I devour by the bagful (did I just admit that?), I have to say, it came a close second to the real candy.  It has a sweet flavor without being overwhelming.  (sorry, I thought I had more pictures of the corn cooking but they must have gotten deleted!)

What fun is it without some dessert though?  My kids LOVED the thought of drinking something called Witches Brew.  It even came out of the blender fizzy and bubbly. 

I hope you scare up some fun and good treats with your family this Halloween!

Bookmark and Share
Photobucket

BAT WINGS
Ingredients:
1/2 cup honey
1 cup soy sauce
1 cup water
2 crushed garlic cloves
2 dozen chicken wings

Directions:
Combine the honey, soy sauce, water, and garlic in a large baking dish, reserving 2/3 cup in a bowl for the sauce.

bat wings

Toss in the chicken wings and marinate for at least 1 hour.

bat wings

Broil for 10 minutes on each side, allowing the wings to char slightly.  (I grilled them.  Be sure to spray grates good prior to grilling to prevent sticking!)   Present with sauce for dipping.

bat wings and candy corn

CANDY CORN
Ingredients:
1 10 ounce package frozen corn
3 Tbs. butter
1 to 2 Tbs. brown sugar
1/4 cup diced, sweet red pepper
2 scallions, chopped (optional, I chose not to use)

Directions:
Cook the frozen corn according to package directions.  Melt the butter in a saucepan over medium-low heat, add the brown sugar, and stir until smooth (be careful the mixture doesn't burn).  Drain the corn and add it to the brown sugar mixture with the red pepper and scallions.  Cook for 2 minutes, stirring constantly.  Serve hot or cold.  

WITCHES BREW
Ingredients:
2 cups apple cider
1 1/2 to 2 cups vanilla ice cream
2 Tbs honey
1/2 teaspoon ground cinnamon
1/4 teaspoon ground nutmeg
food color (optional)

Directions:
Process cider, ice cream, honey, cinnamon and nutmeg in blender until smooth.  (If using food color, add while blending)

witches brew

Pour into glasses and sprinkle with additional nutmeg.  Serve immediately.

witches brew

CHEERS!

witches brew

witches brew


witches brew


Tuesday, October 26, 2010

My Trick or Treater's & Swamp Juice

 Every year my kids and I haggle over what costumes to buy - they usually win with good arguments like I am the one that has to wear it and didn't you always want to be something that you wanted when you were a kid...but this year I won!!

When I saw these 3 costumes in the right sizes the wheels in my mind starting turning.

The oldest and youngest were an easy sell but E wanting to be just like Av wouldn't be convinced unless I let him buy a sword just like Av's.

I think it was well worth it to say YES!

They look adorable!


Avery picked out something so super scary that I had to make Miss Maddy watch him put it on 6 times before she was convinced that it really was just Av.


In the spirit of Halloween I made these cool drinks for my kids - to bad I was unable to find the tapioca pearls since I think would have added a ton more gross factor...but they were still pretty good.

Next time I make them I am only going to use lemonade since we didn't care for the seltzer water taste.

I was so surprised by how realistic the gummi fish looked in the drink...it had oxygen bubbles and everything.

Photobucket


Swap Juice
Disney's Family Fun

Ingredients:
1/2 cup small tapioca pearls (found in the baking aisle of most grocery stores)
Food coloring
4 tablespoons sugar
8 gummy fish
Seltzer water
Lemonade
8 gummy worms

 
MAKE THE EGGS:
Bring 6 cups of water to a boil and add the tapioca pearls. Reduce the heat slightly and boil the pearls, stirring occasionally, for 20 to 25 minutes.


COLOR THE EGGS:
Divide the pearls, with the remaining water, between two bowls. Add 4 drops of food coloring (we used 3 drops of yellow and 1 drop of green in one bowl, and 4 drops of blue in the other) and 2 tablespoons of sugar to each bowl. Stir the mixtures, then allow them to sit uncovered for 20 to 25 minutes. Drain and rinse the pearls with cold water.


ASSEMBLE THE DRINK:
Spoon 2 tablespoons of pearls into each glass and drop in a gummy fish. Fill the glasses with seltzer water, then add a splash of lemonade. Place a gummy worm around a spoon as shown.


Bookmark and Share

Photobucket

Monday, October 25, 2010

Caramel Apple Cupcakes


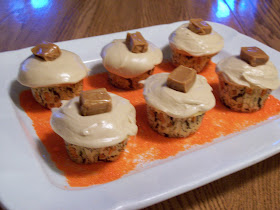
This week here on From Blah to Ta-daa! we'll be showcasing Halloween Treats! It's such an excitement filled week for our kiddos and truly a time of 'treats' as well. At our house it is tradition to make caramel apples Halloween Morning. I chose a new recipe to try this year that shares the same flavors.

Caramel Apple Cupcakes
(recipe found on the Kaboose website)

Cupcake Ingredients:
2 cups sugar
4 eggs
2-1/2 cups all-purpose flour
1 cup milk
3/4 cup vegetable oil
2 apples, peeled and shredded
2-1/4 teaspoons baking powder
1 teaspoon vanilla

1.) Preheat oven to 350 degrees F. Line 2 (12 cup) cupcake pans with cupcake liners. (I found adorable Halloween cupcake liners decorated with pumpkins, ghosts and bats!)

2.)  In a large mixing bowl, with an electric mixer, beat sugar and eggs together until slightly thickened, about 1 minute. Add flour, milk, oil, shredded apple, baking powder, and vanilla and beat for another minute, just until the batter is smooth and creamy. Don't over beat. Pour batter into the prepared cupcake pan(s).  (I find it easier to fill a glass measuring cup, with handle and spout, and 'pour' the batter into the cupcake liners)

3.) Bake in preheated oven for 25-30 minutes or until the tops are golden and a toothpick poked into the center of the layer comes out clean. (In our oven, 30 minutes was perfect)


4.) Allow cupcakes to cool before icing. This recipe made exactly 24 cupcakes.

Caramel Icing Ingredients:

1/2 cup butter
1 cup brown sugar
1/4 cup milk
2- 1/2 cups of confectioners sugar, sifted
1 teaspoon vanilla extract
16 caramel candies

1.) To make icing, melt butter and brown sugar in a medium saucepan over low heat. Cook, stirring occasionally, about 2 minutes. Add milk and continue stirring until mixture comes to a boil. Remove from heat and allow mixture to cool to room temperature. Pour cooled mixture into the bowl of a mixer and add in sifted confectioners sugar and vanilla. Beat on medium speed for 2 minutes, until mixture comes together and is creamy. ( I melted the butter and brown sugar while the first batch of cupcakes were in the oven and let it reach room temperature while the cupcakes were cooling.)

2.) Ice each cupcake with about 2 tablespoons of icing and top each with one caramel candy.

I used exactly 2 tablespoons of icing on each cupcake I frosted and the recipe came up short. I ended up with 7 cupcakes with out icing to cover them. So I'll probably create another 1/2 batch later.


These were so very moist and over the top yummy! I highly recommend this recipe with noted adjustments to the icing recipe.

Happy Halloween Everyone!


Bookmark and Share
Photobucket

Saturday, October 23, 2010

Taking It Easy: Fly Away Favor Bags

Photobucket

Happy Halloween!

This is one of my kids favorite times of the year - they have already got their costumes - and are chomping at the bit to do a little trick or treating.

We have been doing a few recipes and craft projects around the house to try and ease their incessant need to count down the days or ask if it's Halloween yet.

I made these cute and easy fly away favors for my dining room table and one for each of the kids teachers. They were so simple and easy. I filled mine with a big bag of candy corn - a Halloween must have in my family. The kids teachers thought they were really cool plus they all have candy jars for quick rewards...the candy corn went into them.

For the handles I used extra long cinnamon sticks that I found at the antique store - wish that they still smelled as that would have made these even more awesome.


Flyaway Favors 

Marthastewart.com:
Flyaway Favor Bag - Martha Stewart Crafts

Two 4 1/4-by-8-inch brown paper bags
Craft knife or scissors
Small branch
Candy

1. Unfold one brown bag and push out base; fold in the left and right sides.

2. Use a craft knife or scissors and cut the bag into thin strips about 1/4 inch wide. Make sure you stop short of the base.

3. Cut thin strips into the top, 1 1/2 inches of second brown bag. Fill the bag with candy

4. Open the shredded bag fully, laying it flat; place the filled candy bag inside the shredded bag.

5. Bring shredded bag up; cinch top of bags together. Wrap with black wax twine until bags are secure.


Photobucket

Bookmark and Share

Photobucket

Thursday, October 21, 2010

Fresh Apple Cake with Cream Cheese Icing


Let me preface this post by saying I love cooking, but I'm not a baker. I've never claimed to be a baker and to be honest, I find it fairly intimidating. When I cook, I usually say things like, "That looks like about a cup" or "Hmm… I don't have that… Oh, well!" or even "You know what would be really good in this?" and then I proceed to alter the recipe into something entirely different than it was intended to be. I can't do that when I bake. It's a science that I'm not allowed to tinker with because every time I try, the cake doesn't rise, the cookies scorch, or the bread is so dense that it requires a drink of water with each bite. So, when Sara asked me to do a guest blog post I immediately assumed I'd be cooking something for fear of embarrassing myself with an attempt at baking.

Fast forward to Applefest. Oregon Heritage Farms hosts this annual event we like to attend with our young daughter. They sell a variety of apples and kids are fully entertained by the farm animals, hay maze, and pumpkin patch. I came home with gigantic Honeycrisp apples that were so sweet and juicy that they just begged to be baked (How's that for a creepy visual?) I decided to try a family recipe my Grandma Peak gave to my mother back in 1981. I'd never made it before and the handwritten recipe included a small note: "Grandpa Peak's favorite!" How could I pass this up? I figured if the Apple Cake didn't turn out, I'd scrap the pics and cook something else instead. Luckily, it was a hit! The girls in my book club loved it, my family raved, and it was gone within just a few days.

This cake is perfect for Fall. It's football, the start of school, changing leaves, and cable-knit sweaters topped with the sweet excitement for the holidays that are just around the corner. I hope you enjoy it as much as I did!

Jenny,
at Momedy Central blog


Fresh Apple Cake
(Blanche Peak, 1981)

Cake:
2 c. sugar
2 c. flour
2 t. cinnamon
1 t. soda
¼ t. nutmeg
Dash salt
2 eggs
½ c. oil
½ c. pecans
4 c. apples (cored, peeled & coarsely chopped)

Icing:
1 ½ c. powdered sugar
8 oz. cream cheese, softened at room temperature
3 Tbsp. butter, softened at room temperature
½ tsp. vanilla

Preheat oven to 450 degrees. Sift dry ingredients (sugar, flour, cinnamon, soda, nutmeg & salt) to combine in a large bowl. Set aside. In a smaller bowl, combine the eggs and oil then add to dry ingredients. Mix then add chopped apples and pecans. Divide evenly into two 8" round cake pans. Bake 28 – 32 minutes (check with a toothpick).

While the cake bakes, combine soft cream cheese with butter and vanilla. Add powdered sugar and mix well. Set aside and keep at room temp.

Allow cake to cool 20 minutes before removing from pans. Ice the top of one layer before stacking then ice the top layer of the cake. Optional: Top with a few apple slices (soak in cold water with lemon juice for a few minutes to avoid browning). Enjoy!


Ingredient Lineup:


The cake batter before baking:


And after:


The frosting will be soft and spreadable:


Bookmark and Share

Wednesday, October 20, 2010

Stuffed Acorn Squash + Spice Roasted Seeds

It's autumn and time for one of my favorite vegetarian meals.  Our friend Patty gave us this recipe.  This is her 'main course' for their vegetarian Thanksgiving spread.  These are so filling as a main course or a wonderful side dish when quartered.
Patty's Stuffed Acorn Squash
Ingredients:
2 Acorn Squash, washed
2 Celery Stalks, washed and chopped
1 Onion, chopped
1/2 Cup Dried Apricots, chopped
1/2 Cup Dried Cranberries
1/2 Walnuts, chopped
2 Packages of Carolina Wild Rice
1 Teaspoon Ground Ginger
1/8 Teaspoon Ground Black Pepper
1/8 Teaspoon Cloves
1 Teaspoon Cinnamon
1 Tablespoon Olive Oil

Preheat your oven to 375 degrees

Cut the washed squash in half.  Scoop out pulp and seeds.  Separate the seeds from the pulp, wash under running water and place on a paper towel to dry.  The pulp can go in the compost.  Place the cut squash upside down on a cookie sheet and bake for 30 - 40 minutes or until a fork can easily pierce through the shell.
While the squash is baking saute to chopped onion and celery in the olive oil until the onions become translucent.

Cook the wild rice according to package directions.

After the squash is done baking scoop out the flesh leaving a bit in the shell so it can retain it's shape.  Try not to poke through the shell! Put the scooped out squash in a large bowl.

Add to the squash the onions & celery, cooked wild rice, cranberries, walnuts, and apricots.  In a small bowl mix the spices together before adding it to the stuffing mixture.  Combine thoroughly.

Stuff the acorn squash shells, mounding the tops.  Tent the cookie sheet with aluminum foil and bake for another 30 minutes.
I wish you could smell all this goodness! 
Wouldn't a glass of cider be delicious with this?

For a nutritious snack combine the dry squash seeds in a bowl with 2 teaspoons vegetable oil, 2 teaspoons melted butter and 1/4 teaspoon each of cinnamon, allspice & cloves, 1 Tablespoon brown sugar.  Roast your seeds for 15 - 20 minutes in a 350 degree oven. 

I leave these on the counter for everyone to graze on throughout the day.   Enjoy!

Bookmark and Share
  Photobucket