Pages
▼
Friday, September 30, 2011
Friday Fun: 30 Second Organic Air Freshener
This looks so easy - why hadn't I thought of it already?? The directions and photo are straight from Re-Nest, a fun site for all kinds of home pretties and such. Definitely let me know if you try this out and what your favorite fruit/spice combos are!
30 Second Organic Air Freshener
from Re-Nest
Materials
2 (or more) pieces of leftover, inedible fruit parts - e.g. apple core, orange peel
1 sprinkle ground, sweet-smelling spice - e.g. cinnamon, nutmeg, dried vanilla powder
Oil spray
6-inch piece of wax paper, tin foil or small, oven-safe ramekin
Instructions
1. Enjoy delicious apple or other fruit of choice. I highly recommend Pink Ladies right now.
2. Take inedible waste- apple core, orange rind, banana peel- and put on piece of foil or wax paper- folding up edges of paper to make a little well that will keep the waste from leaking out.
3. Spice and Oil: Sprinkle with cinnamon, or other fragrant spice. You can feel free to go crazy here (vanilla extract, cardamom, etc). But remember you're feeding your nose not your mouth, so keep it simple. And quickness is key: This isn't Martha Stewart's 2 weeks potpourri primer. Then liberally mist oil spray to prevent burning.
4. Put in 200 degree Fahrenheit oven until you smell the lovely and all-natural apple/orange/[insert your fruit here] pie-like fragrance. Keep on warm as long as you desire full force of scent. The smell will last for a couple hours even after you turn off oven; just don't open the door.
Wednesday, September 28, 2011
Vanilla Bean Caramel Sauce
This caramel sauce is amazing. And I'm not just referring to the flavor or silky smooth way it melts in your mouth. The way you make it is just so crazy and kinda fun. You see, my previous "caramel" sauce recipe was just melted down brown sugar with butter and whipping cream. Yummy, but nothing that would knock you on the floor in amazement. This recipe, however, is caramelized white sugar combined with whipping cream. I'd never actually caramelized sugar until recently. This is the "dry method," where you throw sugar straight into an empty pot and the heat will melt it and turn it into an amber syrup. Like magic!
I snapped a few photos of the process, so you could see how things look as the sugar begins to melt and caramelize. (There's also a photo of where I went wrong and how to salvage things.)
My tips are these:
When in doubt, lower the heat a little bit. Do not do anything else while you're making this sauce; once the sugar melts it goes straight to caramelized in the blink of an eye. And, the longer/hotter you cook the sauce, the deeper the color, and the smokier(?) the end flavor. It will have a milder, creamier flavor if you don't take it too dark.
I had elaborate visions of using this sauce on the Chocolate Truffle Cakes or cookies, but honestly it's absolute heaven over a really good vanilla ice cream. Oh dear, it was so, so good.
Enjoy!
Vanilla Bean Caramel Sauce
adapted from Annie's Eats
1 c. sugar
1¼ c. heavy cream
¼ tsp. coarse salt or sea salt
1 tsp. vanilla extract or vanilla bean paste
1 Tbsp. unsalted butter, optional
Measure out the heavy cream in a liquid measuring cup and add vanilla bean paste. Microwave for one minute and set aside.
Spread the sugar in an even layer over the bottom of a large, heavy-bottomed saucepan. Place over medium-low heat (dial set to 3 on my stove), watching carefully. When the sugar begins to liquify around the edges, use a heatproof spatula or wooden spoon to gently stir it towards the center. Continue stirring very gently until all the sugar is melted, taking care not to over stir or allow sugar to clump up.
Once the caramel reaches a deep amber color, immediately remove the sauce pan from the heat. Carefully and quickly, stir in half of the heavy cream. The mixture will steam and bubble violently. Stir until the cream is well incorporated, then stir in the remaining cream. Stir in the salt and optional butter. If any sugar has hardened, place the saucepan over low heat and whisk until smooth. Store in an airtight container in the refrigerator. If needed, it can be rewarmed in the microwave or in a saucepan over low heat. Makes 1 1/2 cups.
Ingredient Lineup:
If you shake the pan after it's been cooking, you'll see the layer of melting sugar hiding underneath:
The sugar is turning to liquid and turning a golden color. Aka "caramelizing." Weeeee!!!
Completely caramelized.
Give it a gentle stir to make sure all the sugar granules are dissolved.
The sauce will bubble and steam like crazy when you add the first half of the cream.
Stir constantly to completely incorporate the caramel and cream.
Whoops - This is what happens if you heat the sugar over too high a heat - it clumps up into the hard ball stage. You can rescue it by heating over medium-low heat, stirring constantly, until some of it melts back into the sauce. Even if you don't get it all melted back in, just fish out the hard clumps, and the sauce will still be amazing.
Tuesday, September 27, 2011
Pumpkin Spice Syrup for Coffee
One of the things I miss about living in Southern California is access to The Coffee Bean & Tea Leaf, my most favorite coffee chain. They have the most delicious pumpkin lattes, yummmmm.... And, as we know, I'm totally loving on pumpkin everything right now. So I went on a quest last weekend to figure out my own pumpkin syrup recipe so that I could make my own pumpkin coffee at home (and make it nondairy, while I'm at it!). I tried out 6(!) different recipe variations and finally settled on this one. It's not for a traditional latte, because I don't own an espresso machine at home. It's a syrup that you can add to your coffee as you like, and make cozy with your favorite creamer or half & half.
There are a couple of things you need to know about this recipe - It's not going to be perfectly smooth, like you'd find at Starbucks and the like. Commercially available pumpkin syrups rely on "spice flavors" which don't settle at the bottom like the spices will in this recipe. I also like my pumpkin coffee to taste like pumpkin pie, unlike recipes that are really heavy on spice and low on the actual pumpkin. Feel free to change up the amounts to your liking!
Enjoy!
Pumpkin Spice Syrup
heavily adapted from Savvy Eats
1/3 c. canned pumpkin
1/2 c. sugar
1/2 c. water
2 tsp. pumpkin pie spice (or 1 tsp. cinnamon + 1/2 tsp. ginger + 1/8 tsp. cloves + pinch allspice)
1 Tbsp. vanilla
Whisk all ingredients in a small saucepan. Bring to a boil over low heat and simmer for 5 minutes, stirring occasionally. Strain syrup through a mesh sieve to remove spice grit and pumpkin pulp. Return to pan and bring to a boil over medium heat. Boil for one minute, then remove from heat. Allow to cool before pouring into a container and storing in the refrigerator. Makes about 1/2 pint, or 8oz.
To use: Stir 2-6 tablespoons into a mug of coffee and add your favorite creamer or half & half.
Ingredient Lineup:
Pour syrup through a strainer, and stir to encourage it to flow through the mesh.
Discard the remaining spices and pumpkin pulp.
Stir 2-6 tablespoons into a mug of coffee and add your favorite creamer or half & half.
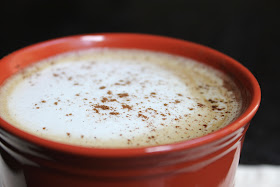
Top with foam and cinnamon for a really pretty cup :)
Store covered in the refrigerator for up to 3 weeks.
Monday, September 26, 2011
Make It From Scratch: Vanilla Extract, Part 1
One month later!:
Cost List (for a double batch):
Vanilla Beans: $25.19
Vodka: $24
Bottles & Lids (including shipping): n/a
Labels: n/a
As of right now, the vanilla costs only $1.75 for each 4oz. bottle. Definitely cheaper than what you'd pay in a grocery store for real vanilla, let alone the imitation stuff. I'll post my update in a few weeks, so you've got some time to purchased some vodka and vanilla beans.
Speaking of vanilla beans, the ones I purchased online - at Olive Nation - are the plumpest vanilla beans I've ever seen. Most recipes require soaking the beans for at least two months, but these beans were so juicy, that they flavored the vodka within a month. Love that!
Annnddddd...! Olive Nation has offered you lovely readers a discount on their vanilla beans - hurrah!
Just enter discount code tadaa10 at checkout
with Olive Nation for a 10% discount.*
Enjoy!
Homemade Vanilla Extract
adapted from Allrecipes
1.75 L vodka (cheap stuff is just fine)
1/4 lb. vanilla beans, about 25 beans
Snip down the length of each vanilla bean to within an inch of one end. Pour out some of the vodka to make room for vanilla beans and then put them all in the bottle. Replace the cap, give it a good shake, and store in a cool, dark area of your kitchen. Shake the bottle once a week. Vanilla will be ready after one month or so, but is best when allowed to soak longer, up to 6 months. Filter the vanilla pieces out and funnel into individual bottles. Will make approximately 14, 4oz bottles.
Part 2 can be found here
Ingredient Lineup:
Use kitchen shears (or a clean pair of scissors) to split the vanilla beans down to within an inch of one end.
Five minutes later, and the bottle on the right is already turning amber-colored!
One month later, and it's full blown vanilla extract!
* 10% discount applies to all items, except perishables like cheese, caviar, fish etc.
Friday, September 23, 2011
Friday Fun: Cookies for Kids' Cancer
How adoooorable is this cookie spatula? I already own two cookie spatulas (which we use daily for making fried eggs), but when I saw this one, my heart skipped a beat. It's just so cute. It just so matches my kitchen. It just so promotoes cooooookiesssssss.
And then I read this on Amazon:
The OXO Good Grips "Good Cookie" Spatula is an important tool in the fight against pediatric cancer. Your purchase of this Limited Edition cookie spatula will help OXO support Cookies for Kids' Cancer, a 501(c)3 non-profit committed to raising awareness of and funds for pediatric cancer research. For more information on this worthy cause, visit www.cookiesforkidscancer.org.It helps fund cancer research for children?? Sign. Me. Up. It's a $7 item that screams adorable and is for a good cause. Please excuse me while I elbow my way to the front of the line.
Thursday, September 22, 2011
Praline Pumpkin Cake
Raise your hand if you're craving pumpkin everything right now! This is the second pumpkin cake I've made this week, and I'm already itching to try out more* recipes this weekend.
So let's talk about this cake - It's a pumpkin-vanilla cake with a pecan praline topping baked in, layered together with cream cheese frosting, and topped with pecans and a caramel drizzle.
Didn't that just make you pass out with the amazingness of it? I don't usually pick recipes that rely on mixes, but this one used up so many things I had sitting around (pumpkin, caramel sauce, cream cheese frosting, and Yellow cake mix), that there's no way I couldn't give it a try. The cake isn't super pumpkin-y, so it'll be a good ease right into Fall. I'm craving pumpkin so much that I almost didn't blog up the recipe, but Bo and my coworkers - who scarfed all the leftovers in thirty minutes - assured me that I needed to because they all loved it. I, on the other hand, probably still wouldn't be satisfied even after bathing in pumpkin, so I'm going to continue on my hunt for the pumpkinest of pumpkin* baked goods :)
Eat this cake at room temp for best flavor, but store it in the fridge. The cream cheese frosting gets really soft otherwise, and you run the risk of your top cake layer slip slidin' away....
Dig In!
* What kind of recipes? Ok, I'm putting it out there so you all will hold me to it - I'm going to tinker with pumpkin syrup recipes so that we all can make homemade pumpkin lattes. Hurrahhh!!!
Praline Pumpkin Cake
adapted from Betty Crocker
1/2 c. unsalted butter
1/4 c. whipping cream
1 c. packed brown sugar
3/4 cup coarsely chopped pecans
1 box Betty Crocker® SuperMoist® yellow cake mix
1 c. canned pumpkin (not pumpkin pie mix)
1/2 c. water
1/3 c. vegetable oil
4 eggs
1 tsp. pumpkin pie spice (= 1/2 tsp. cinnamon + 1/4 tsp. ginger + 1/8 tsp. nutmeg + 1/8 tsp. cloves)
1-2 containers Betty Crocker® Rich & Creamy cream cheese frosting
1/2 tsp. pumpkin pie spice (= 1/4 tsp. cinnamon + 1/8 tsp. ginger + pinch nutmeg + pinch cloves)
Caramel topping **, optional
Additional coarsely chopped pecans, optional
Heat oven to 325°F.
In a small saucepan, stir together butter, whipping cream and brown sugar. Cook over low heat, just until butter is melted. Whisk to completely dissolve the brown sugar. Pour into two ungreased 9- or 8-inch round cake pans; sprinkle evenly with 3/4 cup pecans.
In large bowl beat cake mix, pumpkin, water, oil, eggs and 1 teaspoon of the pumpkin pie spice with electric mixer on low speed until moistened, then on medium speed 2 minutes, scraping bowl occasionally. Carefully spoon batter over pecan mixture into each pan.
Bake 41 - 47 minutes or until cake springs back when touched lightly in center. Cool 5 minutes; then invert from pans onto cooling rack, pecan side up. Cool completely, an hour or more.
Stir remaining 1/2 teaspoon pumpkin pie spice into frosting. To assemble cake, place 1 layer, praline side up, on serving plate. Spread with half of the frosting. Top with second layer, praline side up; spread remaining frosting to edge of layer. Drizzle with caramel topping and additional pecans. Store loosely covered in refrigerator.
** What?? You want a scratch recipe for amazing caramel sauce? Ok, fine. Next week, my dears. It'll rock your world. I promise.
Ingredient Lineup:
Monday, September 19, 2011
Osso Buco
Osso what? Osso Buco ("oh-so boo-ko") literally means "bone with hole" and is an Italian method for braising veal in a white wine broth with vegetables. I've tried it with lamb, turkey, and chicken, and this recipe made with chicken is definitely our favorite. It's traditionally served over risotto, but it's just so amazing over mashed potatoes that I never make it any other way.
This recipe just screams Fall and chilly, bundle-up weather. It's comfort food without being overly heavy and fatty, and the rosemary will make your house smell amazing. While we're on the topic - definitely don't skip the fresh rosemary. It's the star of this recipe, and the broth just won't be nearly so amazing without it.
While Osso Buco may seem fancy and complicated at first, it's really just the same series of easy steps each time: Brown the meat and set it aside. Cook the vegetables. Add the wine and tomato paste. Put the chicken back in with broth, and cook it in the oven for an hour or so. Serve it over mashed potatoes and you'll have dirtied a total of 2 pans and a cutting board for this meal. You just can't beat comfort food that's decently healthy with very little cleanup!
Ciao!
Chicken Osso Buco
6 skinless chicken thighs, bone-in
flour to coat chicken, approx 1 c.
salt & pepper
3 Tbsp. vegetable oil
1 c. carrots, diced
1 c. celery, diced
1 c. onion, diced
3 Tbsp. tomato paste
1 1/2 c. white wine
2 sprigs fresh rosemary
2 bay leaves
32 oz. low-sodium chicken broth
Preheat oven to 350 degrees.
In a large ziploc bag, combine flour with salt and pepper. Add chicken, seal the bag, and shake it to coat the chicken pieces. Shake off excess flour and place chicken on a plate.
Heat oil in a Dutch Oven(or other large, oven-safe pot) over medium-high heat. Add chicken, in a single layer, and brown both sides. Remove chicken to a plate and repeat until all chicken thighs are seared.
Lower the heat to medium. In the same pot (don't discard the oil or any browned bits), add carrots, celery, and onion and cook until the onion is translucent. Add the tomato paste and stir to distribute in the vegetables and cook for 1 minute.
Slowly stir in the white wine and use a wooden spoon to start deglazing the bottom of the pot (i.e., scraping the browned bits up into the broth). Let the wine cook for about 2 minutes.
Add the seared chicken back into the pot, add the rosemary sprigs and bay leaves, and place the pot onto the oven rack just below the middle. Pour in enough chicken broth to cover the chicken. Cover the pot and cook for 1 to 1 1/2 hours. Serve over mashed potatoes, risotto, or polenta.
Ingredient Lineup:
Vocab time: Mirepoix ("meer pwah") is a fancy name for the mixture of diced celery, carrots, and onion.
With the addition of tomato paste and white wine.
Place pot onto oven rack and then pour in enough broth to cover the chicken.
Serve in a rimmed plate, with the broth spooned over mashed potatoes.